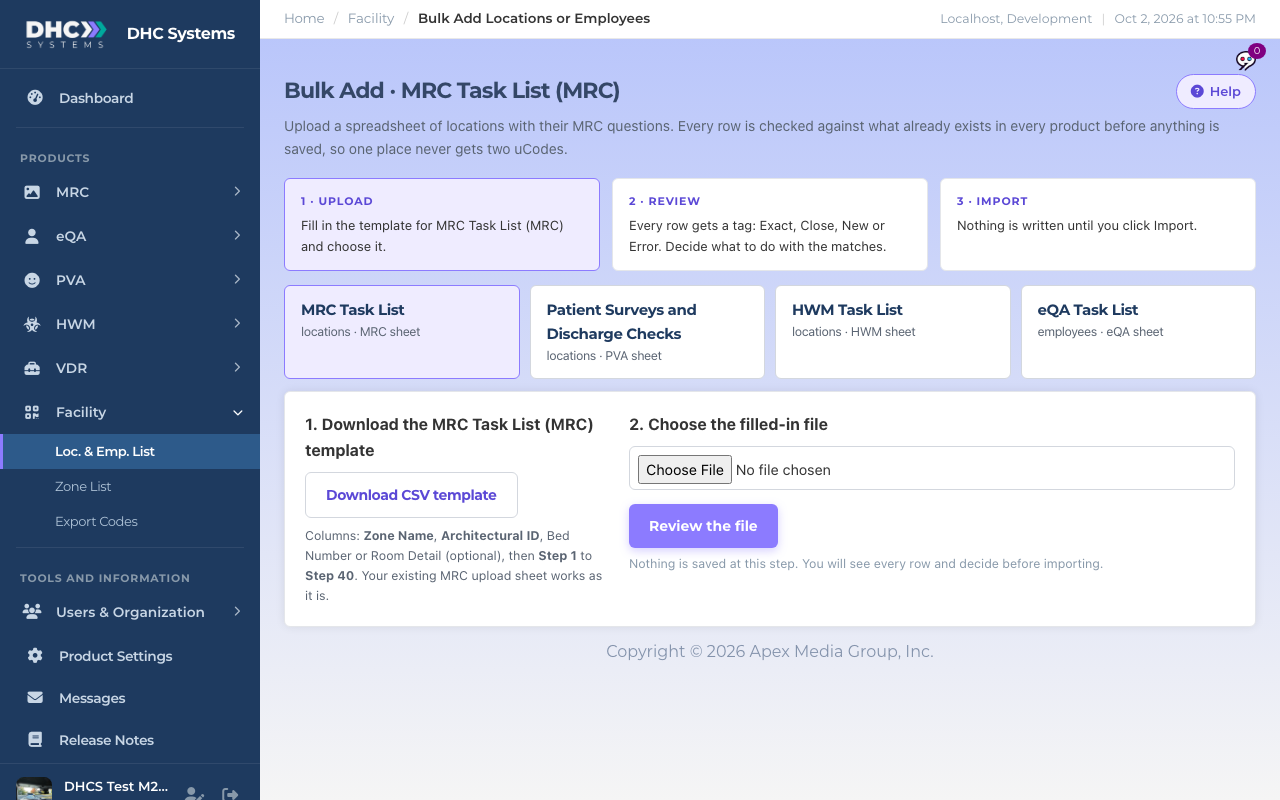
Bulk Add creates many locations or employees at once from a CSV spreadsheet, one product per upload, and checks every row against what already exists (in every product you use) so one place never gets two uCodes. Nothing is saved until you click Import.
Pick the product, download the template, then choose your file
Step 1: Download the template and fill it in
Go to Facility, then Loc. & Emp. List, and click Bulk Add from a spreadsheet.
Pick the product the sheet is for. Only the products your facility uses are offered, for example MRC Task List, Patient Surveys and Discharge Checks (PVA), HWM Task List, or eQA Task List for employees. A single-product facility sees one choice.
Click Download CSV template. Each product’s template has the same columns as that product’s old upload sheet, so a spreadsheet you already use works as it is. The product is switched on for every row; no Y/N columns are needed.
Fill in the rows. The columns, per product, are:
MRC: Zone Name, Architectural ID, Bed Number or Room Detail (optional), then Step 1 to Step 40.
HWM: Zone Name, Location Name, Bed Number or Room Detail (optional), then Step 1 to Step 40.
PVA: Zone, Location or Area Name, Bed Number or Room Detail (optional), Template (optional, a Scan Template name), then Ambassador Question 1 to 15 and Discharge Question 1 to 20.
eQA: Employee Name, Employee ID, Standard Task List (optional, must match one of yours), then Step 1 to Step 25 (optional).
Leave the question cells empty if you want to add questions later.
Save the file as CSV.
Step 2: Upload and review
Click Choose file, pick your CSV, and click Review the file. Nothing is saved at this step.
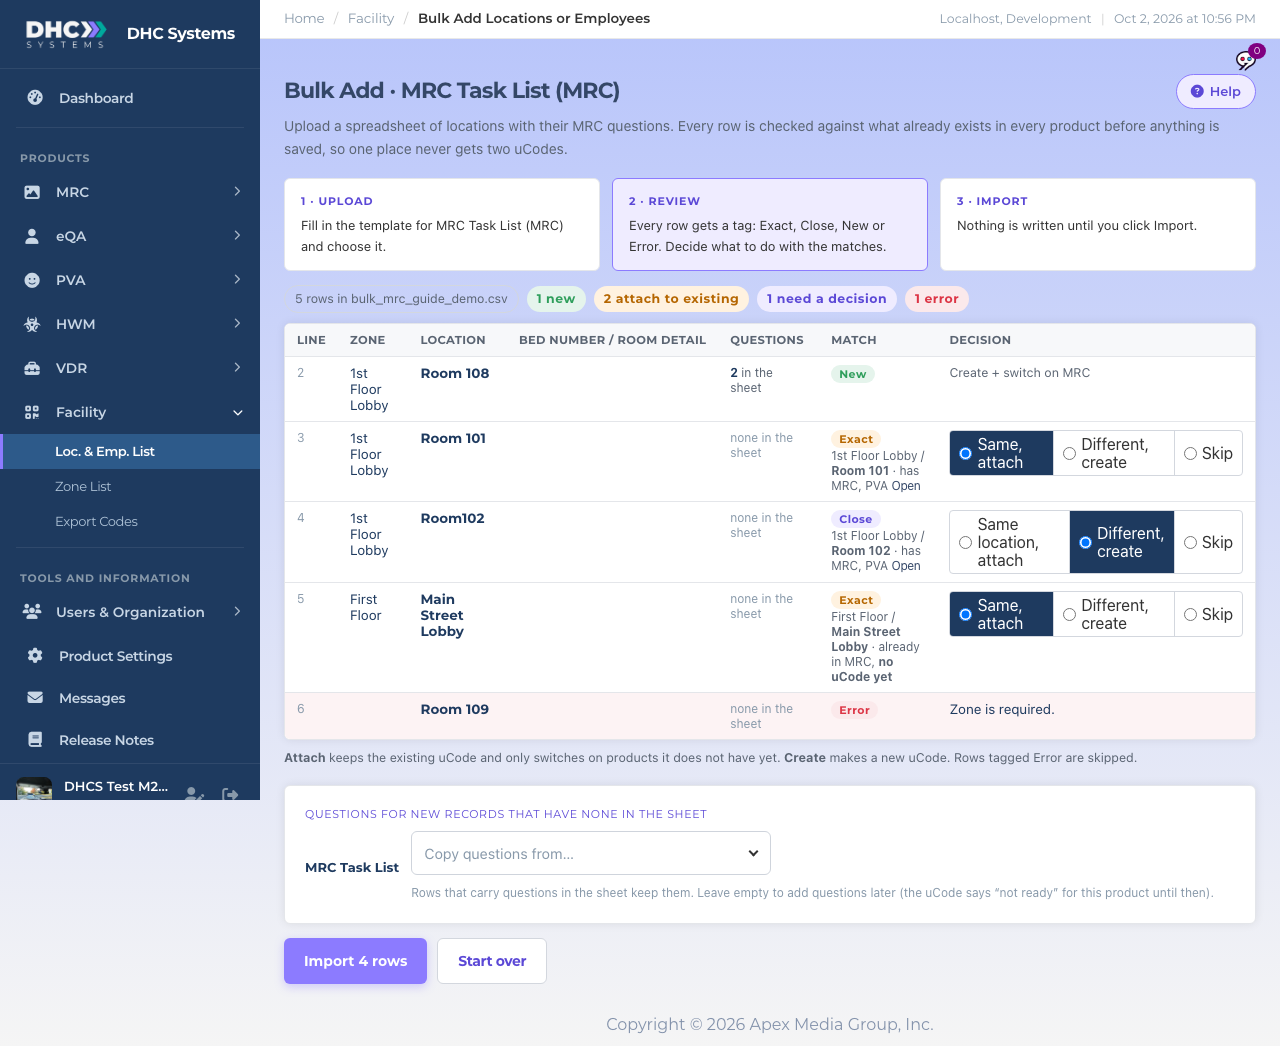
Every row gets a tag in the Match column:
New: no match anywhere. A new uCode will be created and the product switched on.
Exact: already exists, either as a uCode or inside a product with no uCode yet. The row is attached to that record, so nothing is duplicated. The decision is Same, attach by default.
Close: looks similar, for example a typo, a spacing difference, or the same name in another zone. You choose Same, attach, Different, create or Skip. The default is Different, create.
Error: the row is skipped and the reason is shown, for example a missing zone or an unknown template name.
Check the Questions column. It shows how many questions the sheet carries for each row and, where the record already exists, how many it already has.
Every row gets a tag and the matches get a decision
Keep or replace questions
When some of the matched records already have questions for this product and the sheet has questions for them too, a yellow box asks you to choose once for the whole upload:
Keep the questions they already have (the default). Only new records get the sheet’s questions.
Replace them with the questions in this sheet. For a PVA sheet, a row with a Template column puts the room on that template. For an eQA sheet, a row that names a Standard Task List puts the employee on it.
Questions for new rows that have none in the sheet
For locations, a card lets you pick a template (where the product has them, such as PVA) or a record to copy questions from, for new rows whose question cells are empty. Rows that carry questions in the sheet keep them. Leave it empty to add questions later; until then the uCode says “not ready” for that product.
Step 3: Import
Click Import N rows. Rows tagged Error are not counted.
The result says how many were created, attached to existing, how many products were switched on, how many question sets were replaced, and how many were skipped.
Click Print the new uCodes to go straight to Export Codes with the Never printed filter on, or Upload another file.
Who can do this
Directors (M2).
Tips
Where you use more than one product, a room that already exists in one product and is uploaded on another product’s sheet ends up as one uCode that opens both. Attach keeps the existing uCode and only switches on products it does not have yet.
Uploading the same file twice attaches instead of duplicating.
Every uploaded file is kept, so a past import can always be checked.
Use Export with questions on the Loc. & Emp. List to get your current rooms and their questions as a CSV in this layout. Edit it, upload it back, and choose Replace to update questions in bulk.