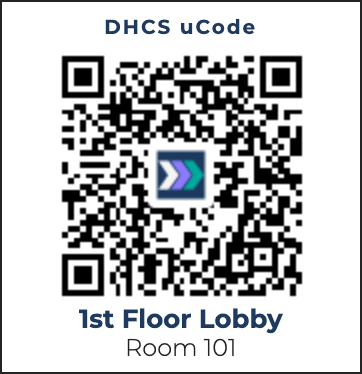
A uCode is one universal QR barcode for a room, bed, area or employee. Scan it and it opens the DHC Systems products your facility uses, as set up for that place or person. One sticker on the door or badge, however many products you use. The Facility pages only ever show the products your facility has, so what you see on screen may be shorter than the examples in this guide.
One uCode as it comes off the print sheet
Why uCodes exist
Until now each product had its own barcode. A room that was in three products had three stickers on the door, and a worker had to find the right one. A uCode replaces those with a single code. The worker scans it and picks the activity from a short menu, or goes straight into the form when only one product is on. If your facility uses one product, the uCode simply opens that product, and the code keeps working as it is if you add another product later.
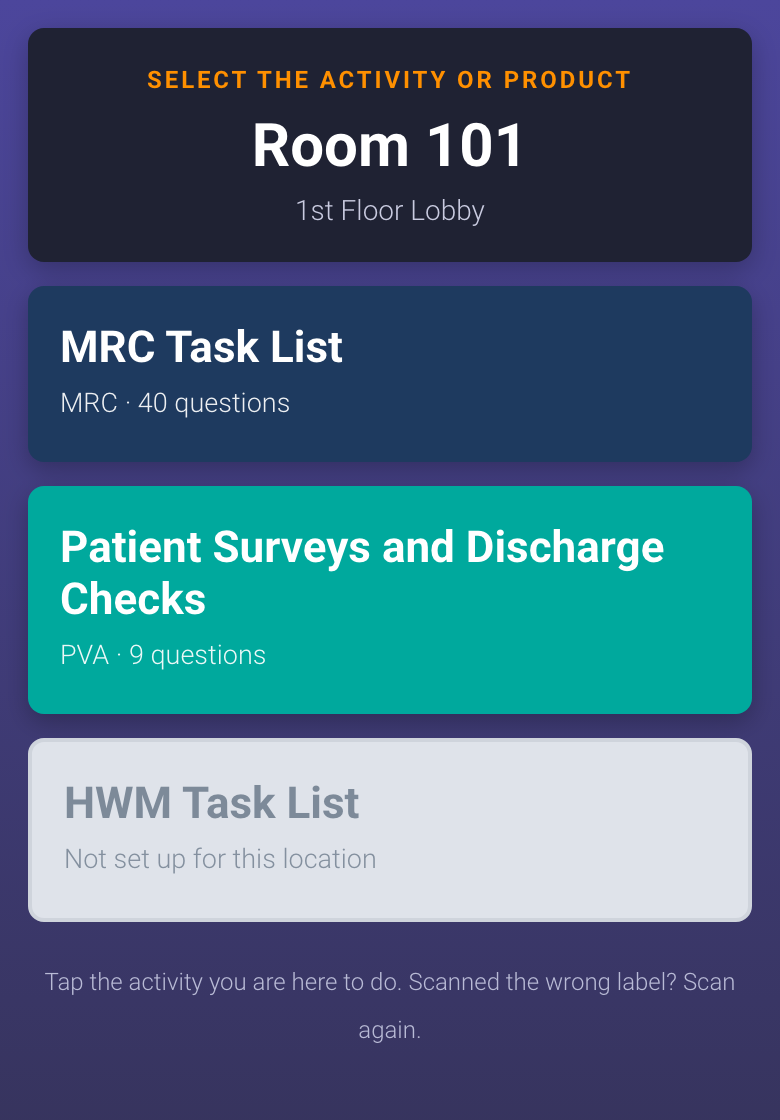
What the worker sees after a scan
The screen shows the room or employee name and zone, with the heading “Select the activity or product”.
Under it is one button per product that is switched on for that record, for example MRC Task List and Patient Surveys and Discharge Checks (PVA).
The worker taps a product and the usual form opens. Nothing about the forms themselves has changed.
If only one product is on and it has questions, there is no menu. The form opens straight away.
A product that is on but has no questions yet shows as “not ready” and cannot be chosen until questions are added.
What the worker sees after a scan when two products are on
How a uCode relates to the barcodes you already printed
Nothing you have printed stops working. The product barcodes already on doors and badges keep scanning exactly as before. A uCode is an extra option, not a replacement you have to make on a deadline.
Your existing records are not copied. The uCode simply points at the record each product already has, so scan history, questions and reports carry on unchanged.
You can run both side by side. Replace stickers zone by zone as it suits you, or never.
Once a room has a uCode, adding another product to it later does not change the code. Reprinting is never needed just because a product was switched on.
A lost or damaged sticker is reprinted with the identical code.
Where to find it
Everything lives under Facility in the left menu:
Loc. & Emp. List: every location and employee with a uCode, what each one opens, and when it was printed.
Zone List: one row per zone, showing what still needs building or printing.
Export Codes: print or PDF the stickers.
Getting started in three steps
Run Build from existing products once. It gives every room and employee you already have in your products a uCode, and merges the same room across products into one code.
Print the new uCodes from Export Codes with the Never printed filter on.
From then on, add new rooms and people under Facility rather than inside a product. The product record is created for you.
Who can do this
Everyone can view the Facility lists and open a record. M1 accounts and higher can add records and edit questions. Directors (M2) can also build, bulk add, print, delete and restore.
Tips
Clients often call QR codes “barcodes”. In the system they mean the same thing; a uCode is a QR barcode.
Using other DHC Systems products? The same uCode also opens them. Ask us about adding a product.
A uCode is never deleted outright. Delete stops it working and moves it to the Deleted tab, so a sticker still on a door can never open the wrong record. Restore brings it back.